
Tour of the window
This page names every part of the ApiWorkbench window, so the other guides make sense. The pictures show a desktop window; the phone layout is described at the end.
The main window
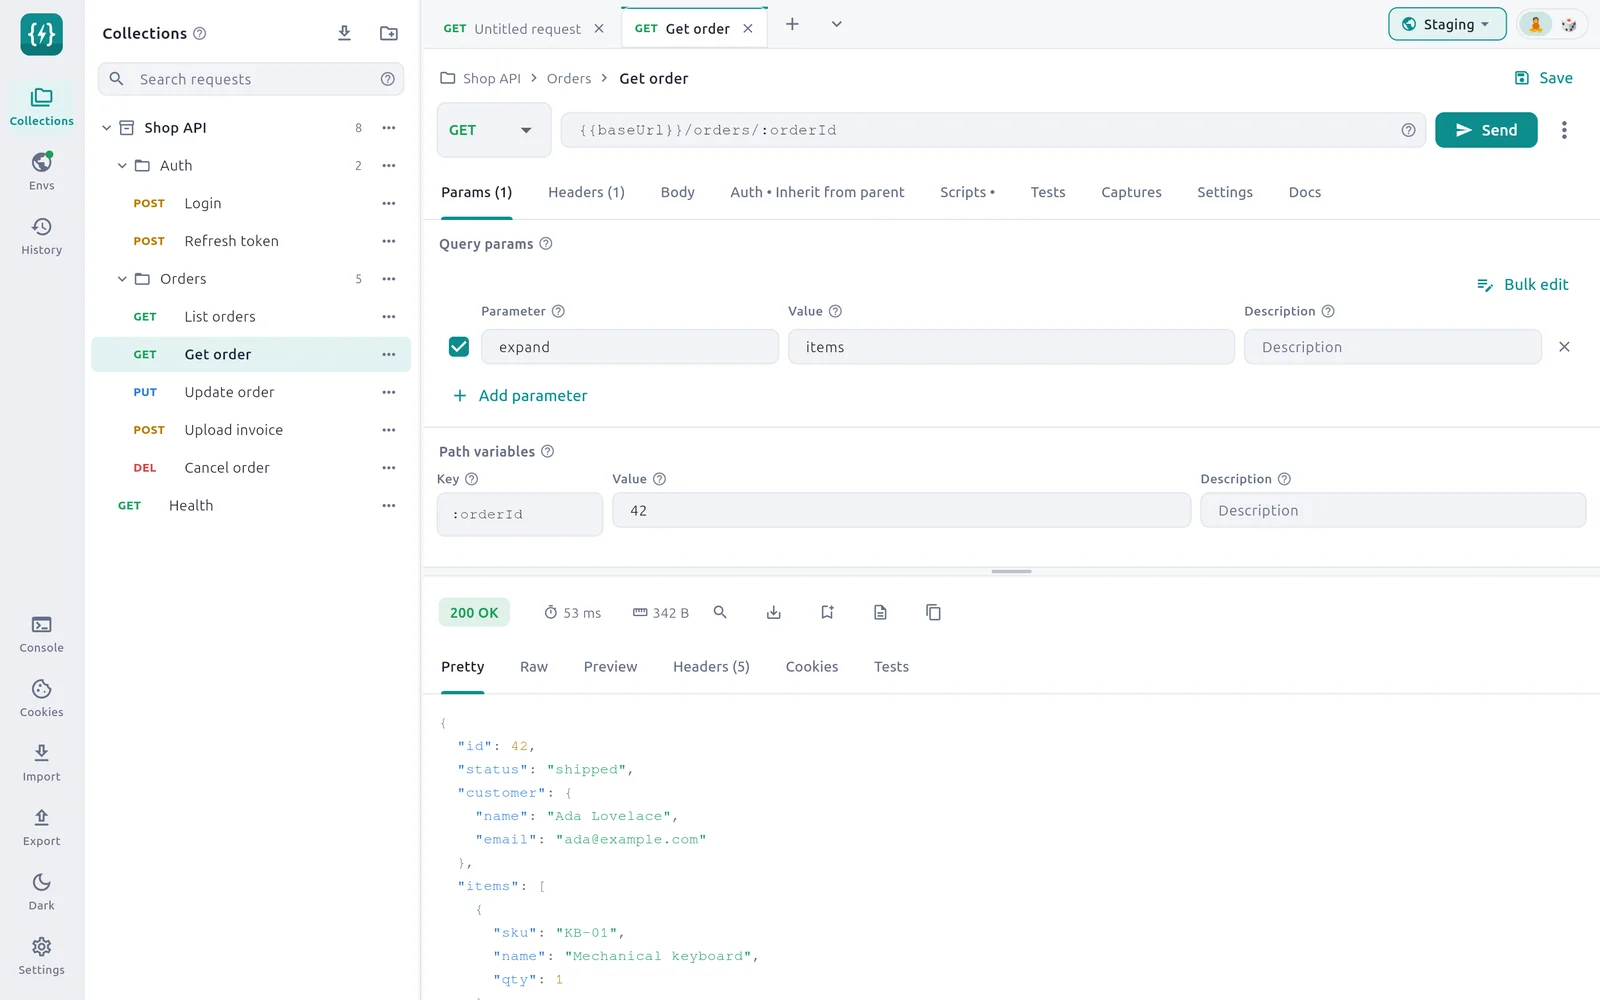
- 1Rail — Switches the side panel between Collections, Envs and History. Click the active item again to hide the panel.
- 2Side panel — Shows what the rail item holds. Here: a collection, its folders and its saved requests.
- 3Request tabs — One tab per open request. The + opens a new tab.
- 4Environment picker — Chooses the set of variables your requests use.
- 5Request editor — Where you build the request: method, URL and the tabs below them.
- 6Splitter — Drag it to give the editor or the response more room.
- 7Response — What the server answered: status, time, size and the body.
- 8Workspace actions — Console, Cookies, Import, Export, the light or dark switch and Settings.
The rail
The rail is the narrow strip on the far left. Its top three items choose what the side panel shows.
| Item | Side panel shows |
|---|---|
| Collections | Your saved requests, in collections and folders. See Collections and folders. |
| Envs | Environments and Globals: sets of variables. See Variables and environments. A green dot on the icon means an environment is active. |
| History | The last 100 requests you sent. See History. |
Click the active item again to hide the side panel and give the editor the full width. Drag the edge of the side panel to make it wider or narrower.
The items at the bottom of the rail act on the whole workspace.
| Item | What it does |
|---|---|
| Console | Opens the Console under the response: every request on the wire, and script output. |
| Cookies | Opens the cookie manager. |
| Import | Brings in Postman, OpenAPI, HAR or workspace files. See Import from Postman. |
| Export | Saves collections and environments to a file. See Export. |
| Dark / Light | Switches the Teal theme between light and dark. |
| Settings | Opens Settings. |
The top bar
- Request tabs sit on the left. Each tab shows the method and the request name. A small dot after the name means unsaved changes. The + button opens a new HTTP request, and the arrow next to it opens a WebSocket, Socket.IO, MQTT, Server-Sent Events or gRPC tab.
- The environment picker shows the active environment, or No environment. Click it to switch.
- The Focus / Chaos toggle on the far right turns response sounds and effects on or off. Focus is quiet.
The request editor
- 1Location and name — The collection and folders the request is saved in, then its name. Click the name to rename it.
- 2Save — Saves your changes. For a new request it reads Save… and asks for a collection.
- 3Method — GET, POST, PUT, PATCH, DELETE, QUERY, HEAD or OPTIONS.
- 4URL — The address the request goes to. Variables and :name segments are allowed.
- 5Send — Sends the request. It turns into Cancel while a request is running.
- 6More — Save to collection, runner, load test, code snippet and cURL.
- 7Editor tabs — Params, Headers, Body, Auth, Scripts, Tests, Captures, Settings and Docs.
The editor tabs hold the parts of a request. A tab's label tells you when it has content: Params (1) counts the rows that are switched on, Auth • Inherit from parent names the auth type, and a dot after Scripts, Settings or Docs means that tab is not empty.
| Tab | What goes there | Guide |
|---|---|---|
| Params | Query parameters and path variables | Query params and path variables |
| Headers | Request headers | Headers |
| Body | The data you send | Request bodies |
| Auth | How the request proves who you are | Authorization |
| Scripts | JavaScript before and after the request | Scripts |
| Tests | Checks on the response | Tests |
| Captures | Values to save from the response | Captures |
| Settings | Redirects, certificates, cookies, timeout | Request settings |
| Docs | A description of the request | Collection docs |
The response
- 1Status — The status code and its meaning. Green is success.
- 2Time — How long the whole exchange took.
- 3Size — The size of the response body.
- 4Body actions — Find in body, save to a file, save as example, save as a Markdown doc, and copy.
- 5Response tabs — Pretty, Raw, Preview, Headers, Cookies and Tests.
- 6Body — The response body. Pretty indents and colours JSON.
Before you send anything, this area reads Hit Send to see the response here. Read the response covers every part.
Hover help
Point at a field, tab, button or badge and wait a moment. A card appears with a title, an explanation and often an example. The small question-mark icons next to labels open the same cards. On a touch screen, press and hold.
When you know your way around, turn the cards off: open Settings and switch off Hover help.
Themes
ApiWorkbench has two themes: Teal, in light or dark, and Graphite and orange, which is dark only. The Dark / Light item on the rail switches Teal between its two modes. Choose the theme in Settings.
On a phone or a narrow window
When the window is narrower than 900 pixels or shorter than 600 pixels, ApiWorkbench switches to a single-column layout. This is what you see on a phone.
- App bar. The menu button on the left opens the side panel as a drawer. The environment picker is on the right, followed by the Workspace menu (three dots) with Import (Postman, workspace)…, Export workspace…, Console, Cookies… and Settings….
- Drawer. Three icon buttons at the top switch between Collections, Environments and History. Tapping a request opens it and closes the drawer.
- Request tabs run under the app bar and scroll sideways.
- Bottom bar. Request shows the editor and Response shows the answer. After you send, a badge on Response shows the status code. Tap Response to read it.
- Editor. On a narrow editor the method and the Send button share the first line and the URL takes the line below. Body types scroll sideways as a row of chips.
Everything else works the same way as on a desktop.
Keyboard shortcuts
| Keys | Action |
|---|---|
| Ctrl + Enter | Send the request |
| Ctrl + S | Save the request to its collection |
| Ctrl + T | New request tab |
| Ctrl + W | Close the tab |
| Ctrl + O | Import |
| Ctrl + F | Find in the response body |
The full list is on Keyboard shortcuts.