
Send your first request
In about ten minutes you will read data from a server with GET, create data with POST, understand the status, time and size of a response, and save both requests in a collection.
What you need
- ApiWorkbench installed. See Install.
- An internet connection.
The tutorial uses JSONPlaceholder, a free practice API. It needs no account and no key. It pretends to save what you send, so you cannot break anything.
If "request", "response" or "JSON" are new words, What is an API? and HTTP basics explain them.
Part 1: read data with GET
A GET request asks a server for data and changes nothing.
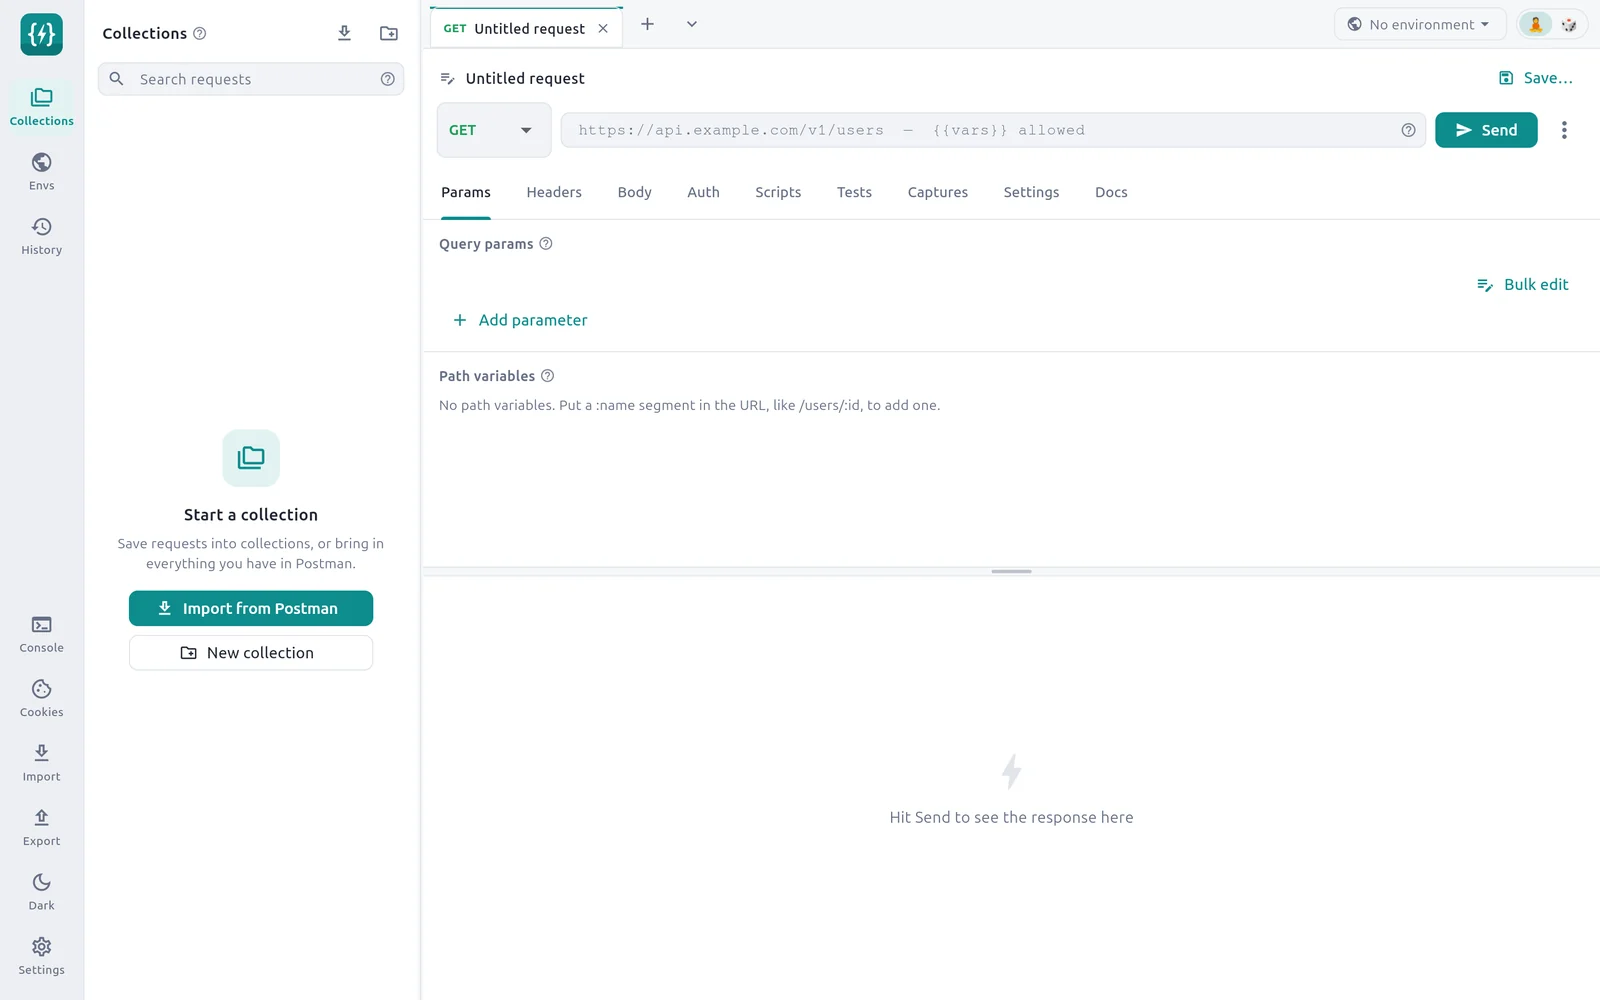
- 1Method — Starts as GET, which is what you need first.
- 2URL — Type the address here.
- 3Send — Sends the request.
- 4Response — The answer appears here.
- 5Save… — Keeps the request in a collection.
Open ApiWorkbench. It starts with one empty tab called Untitled request.
Leave the method on GET.
Click the URL field and type:
texthttps://jsonplaceholder.typicode.com/posts/1Select Send, or press Enter in the URL field.
The lower half of the window shows Sending request… for a moment, then the response.
Read the response
The line at the top of the response is the status bar.
| You see | What it means |
|---|---|
| 200 OK | The status. 200 means the request worked. |
A time, such as 120 ms | How long it took from sending to receiving everything. |
A size, such as 292 B | The size of the response body. |
Your time and size will differ a little.
Under the status bar, the Pretty tab shows the body. It is JSON, indented and coloured:
{
  "userId": 1,
  "id": 1,
  "title": "sunt aut facere repellat provident occaecati excepturi optio reprehenderit",
  "body": "quia et suscipit..."
}
This is post number 1. The 1 at the end of the URL chose it.
Try the other response tabs:
- Raw shows the body exactly as the server sent it.
- Headers lists extra information the server sent, such as
content-type.
TIP
Point at the status, the time or any tab and wait. A card explains it. This works all over the app.
Try a different post
Change the 1 at the end of the URL to 2 and send again. The body changes to post 2.
Now change it to 0 and send. The status turns to 404 Not Found: there is no post 0. A 4xx status means something is wrong with the request. ApiWorkbench shows every status as a normal response, so you can read what the server said.
Change the URL back to end in /posts/1.
Part 2: save the request
Select Save… on the right, above the Send button.
In Request name, type
Get a post.In New collection name, type
Practice.A collection is a group of saved requests, for example one per API or project.
Select Save.
The Collections panel on the left now lists Practice. Click it to open it and see Get a post inside. The line above the URL now reads Practice › Get a post, and the button reads Save.
Part 3: create data with POST
A POST request sends data to the server, usually to create something.
Press Ctrl + T, or select + next to the request tabs. A new empty tab opens.
Click the method and choose POST.
In the URL field, type:
texthttps://jsonplaceholder.typicode.com/postsOpen the Body tab, under the URL.
Select JSON in the row of body types.
Type this in the editor:
json{ "title": "Hello", "body": "My first POST request", "userId": 1 }If the indentation is untidy, select Beautify to tidy it. If you see Body is not valid JSON, check for a missing quote or comma.
Select Send.
The status is 201 Created. The body repeats what you sent, plus an id the server gave the new post:
{
  "title": "Hello",
  "body": "My first POST request",
  "userId": 1,
  "id": 101
}
You did not add a Content-Type header. ApiWorkbench added Content-Type: application/json for you because the body type is JSON.
Save the POST request
Select Save….
In Request name, type
Create a post.Leave Collection on Practice.
Select Save.
Practice now holds two requests. Click either one in the Collections panel to open it again.
What you learned
- A request has a method and a URL, and sometimes a body.
- GET reads. POST sends data.
- The status bar shows the status code, the time and the size.
- 200 and 201 mean success. 404 means the address has nothing.
- Save… keeps a request in a collection, and Ctrl + S saves later changes.
Next steps
- Build a request: every part of the editor
- Read the response: find text, save the body, keep examples
- Variables and environments: stop retyping the server address
- Tests: check the response automatically