
Labs and projects
Circuit Lab has two sets of ready-made work. The Labs tab holds a short course for your board, in order. The Projects tab holds the library: 88 projects you can open on any board they fit. The Playground tab has common parts wired up for any sketch you want to write.
The course
The Labs tab shows the course for the board chosen under Your board. Most boards get ten labs. The ESP32-S3 DevKitC-1 has labs written for it; the other boards get matching projects from the library, wired onto that board.
| Lab | ESP32-S3 DevKitC-1 | Other boards |
|---|---|---|
| 01 | Hello, serial | Hello, serial |
| 02 | The onboard RGB LED | Blink |
| 03 | Blink an LED | External LED |
| 04 | Breathing LED | Breathing LED |
| 05 | A push button | Button toggle |
| 06 | A knob as a dimmer | Knob dimmer |
| 07 | Play a melody | Melody |
| 08 | Commands over serial | Serial commands |
| 09 | Automatic night light | Night light |
| 10 | Traffic light | Traffic light |
The Raspberry Pi 4 / 5 gets six labs, numbered 01 to 06: External LED, Breathing LED, Button toggle, Melody, Serial commands and Traffic light. They are not simulated; you get the circuit and a Python starter script to run on the Pi.
Inside a lab
Select a lab to open it in the workspace. Its guide has these sections, where they apply:
- On the board: which pin each part uses.
- You will learn: the ideas the lab teaches.
- Parts for the real build: every part, with the ones you own highlighted.
- Wiring: a table of what connects to what.
- Steps: what to do, in order. Tap a step to tick it.
- Your turn: a challenge to try on your own.
- Next lab: a button that opens the next lab in the course.
Track your progress
A lab counts as done when every one of its steps is ticked. Ticks are saved on this device only.
The top of the Labs tab shows your progress:
- Labs done, with one box per lab that fills in when it is done, and the counts done by you, ready to build (you own every part) and in the simulator.
- Start here with Start lab 01. Once you have ticked a step or edited a sketch, it becomes Pick up where you left off, with a Continue lab button for the first lab you have not finished.
- All labs, at the bottom of the page, lists the course by group. A filled dot means done, a green ring means ready to build, and an amber ring means parts to get.
What's on your bench?
This part of the Labs tab works out what you can build with what you have.
Tick each part you own. I have them all ticks every part; Clear unticks them.
Read the result beside the parts: how many labs you can build now, the labs that are Ready to build, and the labs that are One part away, with the part to add.
Select Get the list of parts to order to open the Parts tab with a shopping list.
On a simulated board, every lab runs whether you own the parts or not. Your ticks are shared with the Parts tab. See Parts and shopping list.
The project library
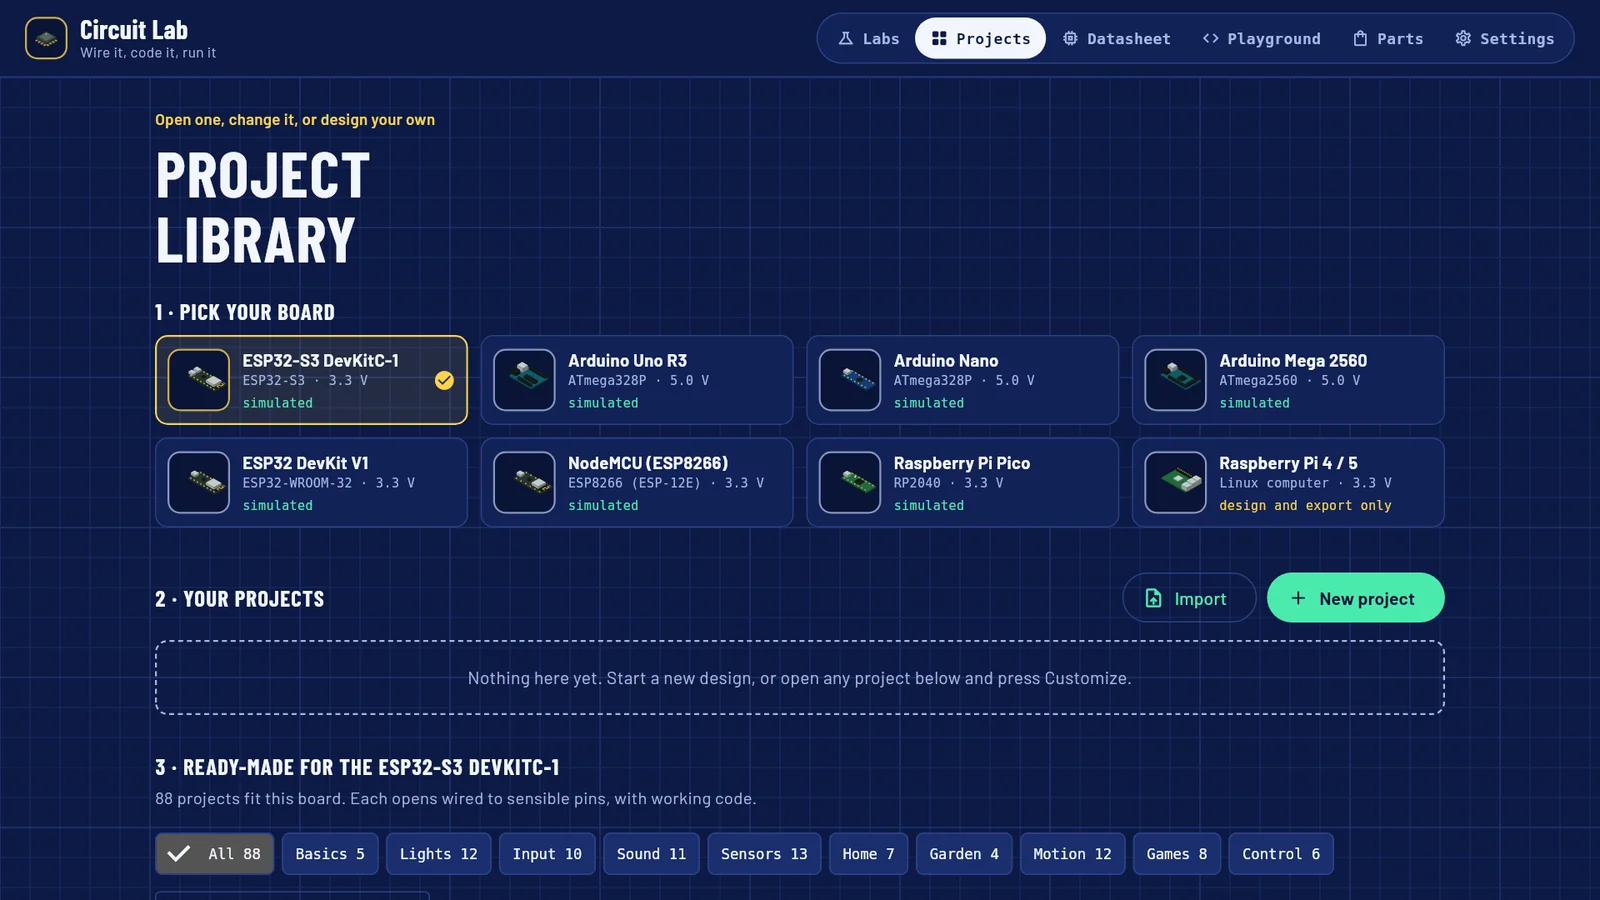
The Projects tab has three parts.
- Pick your board. One card per board, with its chip, its logic voltage, and simulated or design and export only. This is the same choice as Your board on the Labs tab.
- Your projects. Projects you made, customized or imported, with Import and New project. See Design your own circuit.
- Ready-made for the board you picked. It says how many projects fit the board. Filter by group with the chips, or type in the search box, for example
servoorsound. The search looks at each project's title, description and what it teaches.
Each card shows the project's title and description, its group, one to three dots for its level (beginner, intermediate or advanced), and how many parts it uses, or board only.
The groups
| Group | Projects | Some of them |
|---|---|---|
| Basics | 5 | Blink, Hello, serial, Serial echo, Serial calculator |
| Lights | 12 | External LED, Police lights, Scanner, Binary counter, Candle flicker |
| Input | 10 | Button toggle, Knob dimmer, Stopwatch, Combination lock, Logic gates |
| Sound | 11 | Melody, Doorbell, Metronome, Morse beacon, Light theremin |
| Sensors | 13 | Night light, Thermometer, Thermostat, Distance meter, Parking sensor |
| Home | 7 | Motion light, Intruder alarm, Door alarm, Gas and smoke alarm, Leak detector |
| Garden | 4 | Thirsty plant, Automatic watering, Greenhouse controller, Rain barrel pump guard |
| Motion | 12 | Servo sweep, Automatic gate, Radar sweep, Motor speed knob, Hands-free bin |
| Games | 8 | Reaction timer, Electronic dice, Guess the number, Memory game |
| Control | 6 | Serial commands, Traffic light, Countdown timer, Smart fan, Pedestrian crossing |
Which projects fit which board
Each project lists the parts it needs, and the app gives each part a pin from the board's recommended pins: analog inputs first, then pins with PWM for parts that dim, then the rest. So the same project can use different pins on different boards, and its code uses that board's own pin names, such as A0 on an Uno or D1 on a NodeMCU.
A project that needs more pins or hardware than a board has is left out for that board.
| Board | Projects |
|---|---|
| ESP32-S3 DevKitC-1 | All 88 |
| Arduino Uno R3, Nano, Mega 2560, ESP32 DevKit V1, Raspberry Pi Pico | 87: all but RGB mood lamp, which uses the ESP32-S3's built-in RGB LED |
| NodeMCU (ESP8266) | 83: also not Data logger, Memory game, Room monitor and Greenhouse controller |
| Raspberry Pi 4 / 5 | 50, design and export only |
At the bottom of the list, the app names the projects that are not available on your board, and why.
On a Raspberry Pi 4 / 5, each project gets the circuit, the parts and a generated Python starter script that sets up every part with the gpiozero library. It is a starting point, not the project's full program.
Change a library project
You can edit a library project's code. Your edits are saved on this device, and the editor's header says edited · saved. Restore starter code, the round arrow at the top, puts the original back; it is hidden on phone-sized screens.
The circuit of a library project cannot change. To add, remove or move parts, select Customize to make your own copy. See Design your own circuit.
The playground
The Playground tab is a workspace with common parts already wired to your board: a red and a green LED, a button, a knob, a buzzer, a yellow LED and a light sensor, as many as the board's pins allow. A NodeMCU has no light sensor, because it has only one analog input. A Raspberry Pi 4 / 5 gets the two LEDs and the button, for designing only.
The editor holds a starter sketch that uses every part. Write any sketch and select Run. Your edits are kept. To keep a copy of your own, select Customize: it is saved as My and the board's name, for example My Arduino Uno R3 project, under Your projects.
The playground follows Your board: choosing another board gives you that board's playground.