
Connect over Wi-Fi
Use a device without the cable. This page covers pairing a phone that runs Android 11 or newer, switching an older phone to Wi-Fi over USB, and reconnecting later with one click.
The phone and the computer must be on the same network.
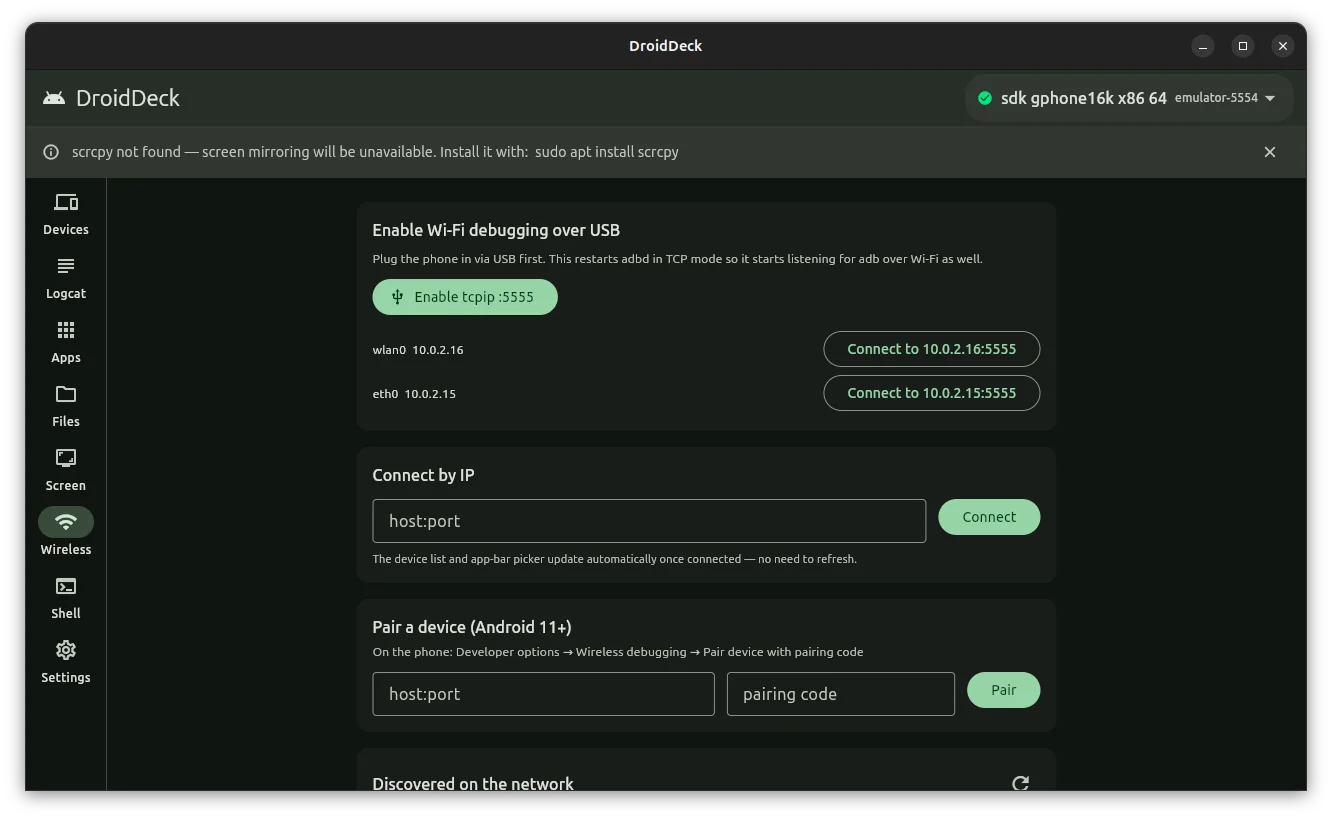
How wireless debugging works
Over USB, the cable itself proves the device is yours. Over Wi-Fi there is no cable, so Android offers two ways to set up trust:
- Android 11 and newer has a Wireless debugging setting. You pair the computer with the phone once, using a six-digit code shown on the phone, and then connect. Pairing and connecting use two different port numbers.
- Android 10 and older has no pairing. You connect over USB first, tell the phone to also listen on the network, and then connect to its IP address on port 5555.
In both cases you give DroidDeck an address in the form host:port: the phone's IP address, a colon, and a port number.
Pair a phone with a pairing code (Android 11+)
On the phone, open Settings, then Developer options, then Wireless debugging, and turn it on.
Select Pair device with pairing code.
The phone shows an IP address and port, and a six-digit code.
In DroidDeck, open the Wireless tab and find the Pair a device (Android 11+) card.
Type the address and port from the phone into host:port, type the code into pairing code, and select Pair.
When it works, the card shows Paired — now connect using the port shown under Wireless debugging.
On the phone, go back to the main Wireless debugging screen and read the IP address and port shown there.
This port is different from the pairing port.
In DroidDeck, type that address and port into host:port in the Connect by IP card and select Connect.
The phone appears in the device list and the device picker with a Wi-Fi icon. You do not need to refresh anything.
You pair once per computer. Later, only steps 5 and 6 are needed, and the connect port can change each time Wireless debugging is turned on.
Switch a USB-connected phone to Wi-Fi
This works on any Android version and is the only way on Android 10 and older.
Connect the phone over USB and make sure it is online and selected in the device picker.
On the Wireless tab, in the Enable Wi-Fi debugging over USB card, select Enable tcpip :5555.
The phone's debugging service restarts and starts listening on the network as well.
The card lists the phone's IP addresses, each with a button. Select Connect to followed by the phone's Wi-Fi address.
Unplug the cable. The phone stays in the device list under its IP address.
WARNING
DroidDeck shows this note under the button, and it matters: TCP debugging stays open on the device until reverted — anyone on the same network can try to connect to port 5555. Do not leave it on in a café, a shared office or any network you do not control. When you are finished, select the phone and choose Revert to USB.
Connect to a device you already know
Type the device's host:port into the Connect by IP card and select Connect, or press Enter in the field.
Use the discovered list
The Discovered on the network card lists phones that announce wireless debugging on your network. Select Refresh, the round arrow, to search again.
- Pair… next to an entry copies its address into the Pair a device card. Type the code and select Pair.
- Connect next to an entry connects to it.
If the card reads No services discovered, either no phone on this network has Wireless debugging on, or your adb cannot discover devices. Type the address by hand instead. In the Snap Store package this list is always empty.
Reconnect to a saved device
Every address you connect to is remembered in the Saved devices card, most recent first.
- Select Connect next to an address to reconnect.
- Select the bin icon, Remove, to forget an address.
A saved address stops working when the phone gets a new IP address or, on Android 11 and newer, a new connect port. Read the current values on the phone and connect again.
Next steps
- Connect a device: states and the device picker.
- Use the screen tools
- Troubleshooting and FAQ